
Lesson 31 | Using Layouts
In this lesson, you learn how to create a layout, which is the environment you use to prepare your drawing for plotting. You also learn how to switch between layouts and layout viewports.
Plotting is a vital step in the process of communicating your design and the use of layouts is an important part of preparing for plotting.
The following illustration shows geometry that resides in model space and a plot preview from a corresponding layout.

Objectives
After completing this lesson, you will be able to:
- Describe the purpose and key properties of layouts.
- Create a new layout.
About Layouts
A layout is an environment used to output your drawing data. That data can include model space geometry and geometry added to the layout to enhance a specific plotted sheet.
The following image shows an empty layout in a drawing. You can see the paper size, the printable area within the dashed lines, and the rectangular viewport for the selected layout.
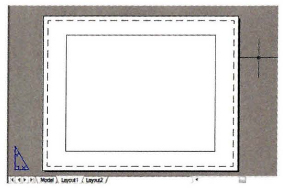
Defining the Layout
In a layout, you select what paper size you want to plot on. That paper size is then displayed at a visual full scale with a dashed rectangle indicating the area the selected plotter can plot within for that size paper. You also select paper orientation.
With the paper in the layout displaying at full scale, you insert your border and title block on the sheet at full scale. You can also create textual notes at full scale on the paper.
You display model space geometry on the paper in the layout by creating viewports. You can define multiple viewports and set their scale and location.
The following are some of the properties and settings that you can save in a layout:
- Printer/plotter
- Paper size
- Plot area
- Plot offset
- Plot style table
- Drawing orientation
- Plot scale
Example of Layouts
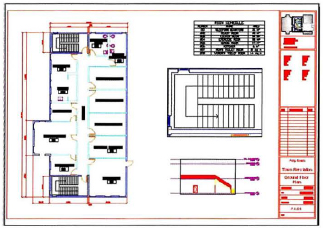
One advantage of using layouts is being able to plot using multiple scale factors on the same drawing sheet. For example, you can display an overall view of a floor plan at one scale, and right next to it two detail views, each at their own scales.
The following illustration shows a completed layout that includes the floor plan at a common scale; an elevation at a smaller scale; and a detail of the stairwell blown up at a larger scale.
Creating a New Layout
You can add layouts to the current drawing based on a layout in a template file, by copying an existing layout in the drawing, or by adding a new one. To add a new layout, you use the Layout, New Layout, or Create Layout Wizard commands.
Command Access


Note: Available only once Layout and Model tabs are displayed.
Menu Bar: Insert > Layout > New Layout
Procedure: Creating a New Layout
The following steps give an overview of creating a new layout in the drawing.
- Right-click the Model tab or any layout tab.
- Click New Layout.
- Click the layout tab for the newly created layout.
Procedure: Creating a New Layout with the Layout Wizard
The following steps give an overview of creating a new layout in the drawing using the Create Layout Wizard.
- On the command line, enter LAYOUTWIZARD.
- Step through the wizard screen to:
- Name the layout
- Select a configured plotter
- Select a paper size and its units of measurement
- Select a paper orientation
- Pick a standard title block if desired
- Define the number of viewports and their scales
- Set the location for the viewports on the paper
- Click Finish.