Lesson 26 | Joining Objects
When you edit drawings, extra objects that are produced increase the overall size of the drawing and may complicate your drawing process.
Several situations can lead to incomplete or incorrect geometry such as broken line segments, arcs, or open polylines. Importing geometry from other programs or 2D geometry that originated in a 3D model could result in geometry that appears to be correct but, on closer examination, contains unwanted breaks. Use the Join command to fix these broken objects and combine them into single objects.
Objectives
After completing this lesson, you will be able to:
- Use the Join command to join similar objects.
Joining Objects
Use the Join command to combine individual segments of like objects into a single object, to reduce file size, and to improve drawing quality. The Join command can be used on polylines, lines, arcs, elliptical arcs, and splines.
Command Access
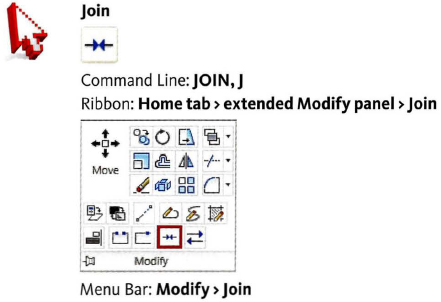
Command Options
With the Join command, you can combine similar objects into one object.
| Option | Description |
| Select source object. | Offsets a selected object the distance of a point picked in the drawing window. |
| Select objects to join to source | Use this option to select objects that you join to the source object. |
| Select arcs to join to source or [cLose] | This option appears if the source object is an arc. The close option closes the arc and converts it to a circle. |
| Select elliptical arcs to join to source or [cLose] | This option appears if the source object is an elliptical arc. The close option closes the elliptical arc. |
Join Command Example
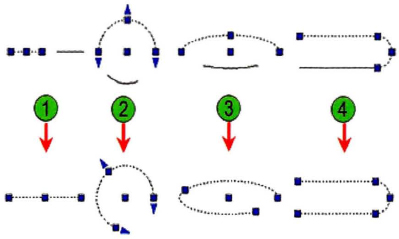
| Two lines with a gap are joined into a single line. | |
| Two concentric arcs are joined into a single arc. | |
| Two concentric ellipse objects are joined into a single ellipse. | |
| A line is joined to an open polyline. |
Procedure: joining Lines with the Join Command
The following steps provide an overview of joining lines using Join.
- On the Modify panel, click Join.
- Select the source line.

- Select the other lines to join to the source line and press ENTER.

The selected line segments are joined together.

Procedure: Converting an Arc to a Circle with the Join Command
The following steps provide an overview of converting an arc to a circle using the Join command.
- On the Modify Draw panel, click Join.
- Select an arc.

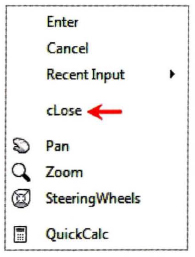
- Right-click and click Close on the shortcut menu. The arc is converted to a circle.

Guidelines
When you use the Join command to join objects, the following rules apply.
- Lines:
- Segments must be collinear.
- Segments can overlap.
- Segments can have a gap between them.
- Polylines and splines:
- Must be coplanar.
- Must share a common endpoint.
- Segments cannot overlap.
- Lines and arcs can be joined to polylines if a polyline is selected as the source object.
- Arcs:
- Must share the same circular path.
- Segments can overlap.
- Segments can have a gap between them.
- Elliptical Arcs:
- Must share the same elliptical path.
Joining Arcs or Elliptical Arcs
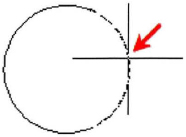
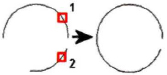
When you join arcs or elliptical arcs together, the source object is always extended to the other objects in a counterclockwise direction. In the following image, the source arc is selected at point (1) while the other arc is selected at point (2). The source arc is extended counterclockwise to meet the other arc.

Practice Exercise | Joining Objects
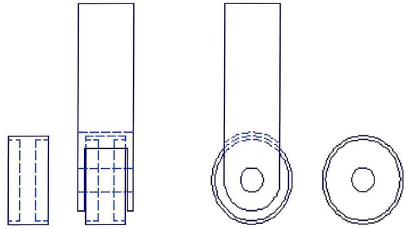
Quite often when you edit your drawing, changes occur that require you to join or rejoin segments. In this practice exercise, you draw a circle and a line with a rectangle that overlaps both objects. First trim these objects, then erase the rectangle. Use the Join command to reconnect the circle and line segments.
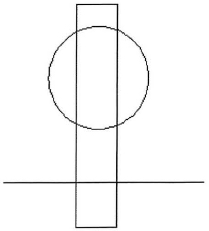
- Draw the circle, line and rectangle as illustrated above.
- To Trim the circle and the line:
- Begin the Trim command.
- Select the rectangle for the cutting edge and press ENTER.
- Select the portion of the line and circle inside the rectangle to trim.
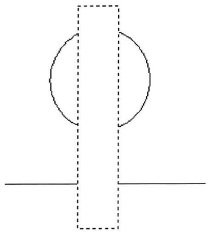
- Erase the rectangle.
- To join the line segments:
- To Join the arc segments and close them. Method 1:
- Begin the Join command.
- Select one arc (1) then select the other (2). Press ENTER to join the two arcs.
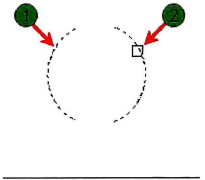
Notice how the arcs work in a counterclockwise direction. The order in which you select the arcs determines how they are joined. For instance, if you had selected arc (2) first then arc (1), the segments would have been joined at the top.
- Repeat the Join command
- Select the arc.
- Right-click on the selected object. Click Close.

Note: If you were to enter this option at the command line, you would enter L and press ENTER, indicated by the capitalized letter L.
- The arc is now closed, making it a circle again.

- To Join the arc segments and close them. Method 2:
- Begin the Join command.
- Select one arc segment.
- Right-click the selected object. Click Close.
The arc is now closed to form a circle, but the remaining arc segment should be erased.
- Begin the Erase command.
- Hold down SHIFT+SPACEBAR and select the circle in the area of the remaining arc segment. Click until you see that the arc segment is selected.
- Press ENTER to erase the arc.