
Exercise | Create a Drawing Template
In this exercise, you create a drawing template that contains text styles, dimension styles, drawing units, layers, layouts, and a title block.
Scenario
You do the following:
- Set units, styles, layer properties, and page setup.
- Create a drawing template.
- Open a drawing based on a new template file.
The completed exercise
Completing the Exercise
To complete the exercise, follow the steps in this book or in the onscreen exercise. In the onscreen list of chapters and exercises, click Chapter 13: Template Drawing Creation. Click Exercise: Create a Drawing Template.
![]()
Set Units, Styles, Layer Properties, and Page Setup
- Open c_create_drawing_template.dwg.
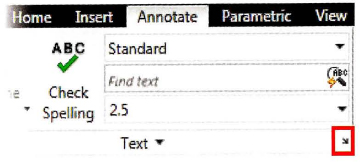
- On the Annotate tab, Text panel, click Text Style.
You are creating architectural drawings and need to have the layer settings that correspond to AIA standards. You decide to specify the required layer settings in a template that you can use for all the typical architectural drawings.
- In the Text Style dialog box:
- Select Arial from the Font Name list.
- Click Apply to save the changes.
- In the Text Style dialog box, click New.
- In the New Text Style dialog box:
- For Style Name, enter 3.5 Gen Notes.
- Click OK.
- In the Text Style dialog box:
- Select Tahoma from the Font Name list.
- For Height, enter 3.5.
- Click Apply to save the changes.
- Click Close.
- On the Annotate tab, Text panel, select Standard in the Text Styles list.
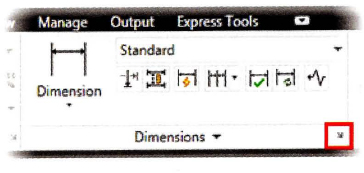
- On the Annotate tab, Dimension panel, click Dimension Style.
- In the Dimension Style Manager dialog box, click Modify.
- In the Modify Dimension Style dialog box:
- On the Primary Units tab, select ‘.’ (Period) from the Decimal Separator list.
- On the Text tab, under Text Alignment, click the ISO standard.
- Click OK.
- Click Close to exit the Dimension Style Manager.
- On the Home tab, Layers panel, click Layer Properties to display the Layer Properties Manager.

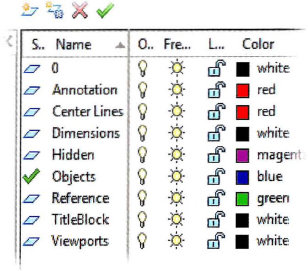
- In the Layer Properties Manager:
- Create new layers and assign layer properties, as shown.
- Set the Objects layer current.
- Close the Layer Properties Manager.
Note: Color assignments are not critical. Use your own color preferences.
- On the status bar, click Layout1 to activate Layout1.
- Select the predefined viewport.
- Right-click anywhere in the drawing. Click Display Viewport Objects > No.
- On the application menu, click Print > Page Setup.
- In the Page Setup Manager, click New.
- In the New Page Setup dialog box:
- For New page setup name, enter A2-ePlot.
- Click OK.
- In the Page Setup - Layout1 dialog box:
- Select DWF6 ePlot.pc3 from the Name list as the printer/plotter device.
- Select ISO A2 (594.00 × 420.00 MM) from the Paper size list.
- Ensure that 1:1 is selected from the Scale list.
- Click OK.
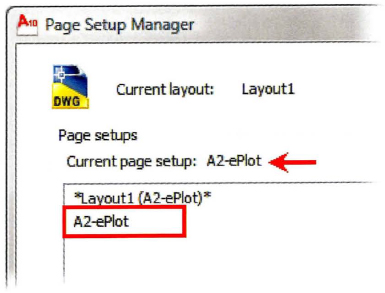
- In the Page Setup Manager dialog box, double-click the A2-ePlot page setup to assign it to Layout1 and click Close.
- Continue to the next exercise or close all files without saving.
Create a Drawing Template
- On the Home tab, Layers panel, select TitleBlock in the Layers list.
- On the Insert tab, Block panel, click Insert.
- In the Insert dialog box, click Browse.
- In the Select Drawing File dialog box, navigate to A2-Title.dwg.
- Click Open.
- Make sure Specify On-screen is not checked, enter 0,0,0 for the insertion point, and complete the block insertion procedure.
- Click OK
- To delete the extra layout:
- On the status bar. click Quick View Layouts

- Right-click the Layout2 preview, and click Delete.
- In the AutoCAD dialog box, click OK.
- On the status bar. click Quick View Layouts
- Click the Model tab to activate model space.
- On the Home tab, Layers panel, select Objects in the Layer list.
- Right-click anywhere in the drawing. Click Options.
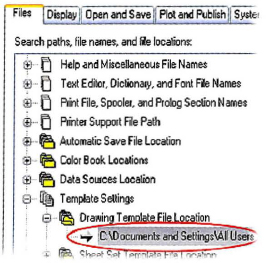
- In the Options dialog box, Files tab, expand Template Settings > Drawing Template File Location.
- Double-dick the existing path.
- In the Browse for Folder dialog box, navigate to the location where the exercise datasets are installed and click OK.
- Click OK to close the Options dialog box.
Note: In a real world situation, these .dwt files would probably be stored on a network where all users would have access to them.
- On the Application menu, click Save As > AutoCAD Drawing Template.
- In the Save Drawing As dialog box:
- Verify AutoCAD Drawing Template (*.dwt) is selected from the Files of Type list.
- Verify that the Save In folder switches to the location specified in the Options dialog box.
- For File name, enter A2-Template.
- Click Save.
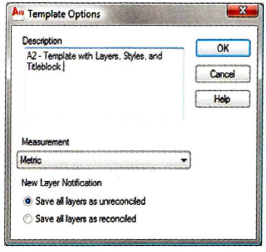
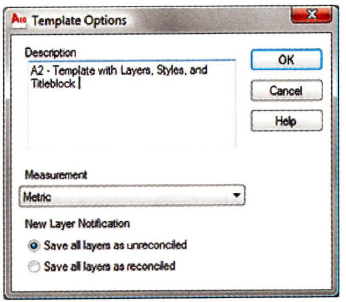
- In the Template Options dialog box, enter the description as shown and click OK.
- Close all drawings. Do not save.
Open a Drawing Based on New Template File
- To start a new drawing using the new template:
- In the Application menu, click New > Drawing.
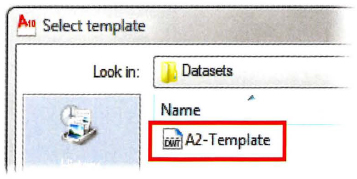
- In the Select Template dialog box, select the template and click Open.
- Check the units, layers, text styles, dimension styles, Layout1 settings, and title block of the new drawing.
- Right-click anywhere in the drawing. Click Options.
- Return the configuration settings to their default settings. In the Options dialog box, Files tab:
- Expand Template Settings > Drawing Template File Location.
- Double-click the existing path.
- Navigate to the default location for the template file C:Users<user name>AppDataLocalAutodeskAutoCAD 2010R18enuTemplate.
Note: For AutoCAD LT® users, navigate to C:Users<user name>AppDataLocalAutodeskAutoCAD LT 2010R15enuTemplate
- Click OK in the Browse for Folder dialog box.
- Click OK to close the Options dialog box.
- Close all files without saving.
Chapter Summary
Because drawing templates serve as the basis for all new drawings you create, you should spend time creating and maintaining the required templates. If you are working in a multi-user design environment, this process becomes even more critical, as the time saved by using templates can be multiplied by the number of people creating new drawings.
Having completed this chapter, you can: