
Challenge Exercise | Architectural
In this exercise, you use what you learned about creating drawing objects to create a table, a closed polyline for calculating an area, and spline topographic lines.
Tip
You have the option of completing this exercise using either imperial or metric units. Select one version of the exercise to complete the steps.
![]()
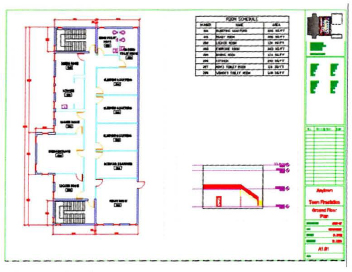
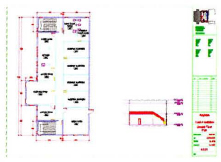
The completed exercise
Completing the Exercise
To complete the exercise, follow the steps in this book or in the onscreen exercise. In the onscreen list of chapters and exercises, click Chapter 11: Creating Additional Drawing Objects. Click Challenge Exercise: Architectural Metric.
![]()
Metric Units
- Open the drawing you saved from the previous challenge exercise, or open M_ARCH-Challenge-CHP11.dwg.
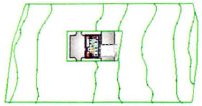
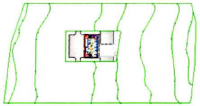
- Set layers and create contours.
- Thaw and set current the existing layer, Topo.
- Draw smooth curved contours from node to node as shown.
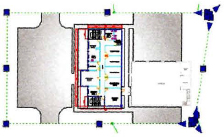
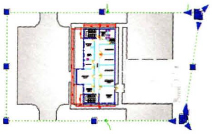
- Calculate the square area of the lot this fire station sits on. The lot is shown with the blue grips active in the following image.
- Place a title block on the layout.
- Activate the Plan View layout.
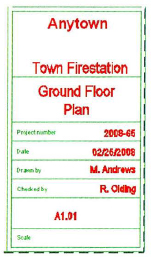
- Insert the block Titleblock centered on the layout.
- Add text to the title block as shown.
- Add and configure two viewports.
- A view of the elevation detail at a scale of 1:100.
- The key plan in the upper-right corner of the title block, zoomed to fit. For each of the viewport configurations, adjust the layer display to achieve the results shown.
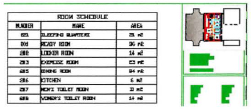
- Create a table showing the following Room Schedule data:
- NUMBER - NAME - AREA
- 221 - SLEEPING QUARTERS - 21 m2
- 201-READYROOM-36m2
- 202 - LOCKER ROOM - 14 m2
- 203 - EXERCISE ROOM - 23 m2
- 205 - DINING ROOM - 24 m2
- 206-KITCHEN-6m2
- 207 - MEN'S TOILET ROOM - 11 m2
- 208 - WOMEN'S TOILET ROOM - 14 m2

- Save and close the drawing.
Imperial Units
- Open the drawing you saved from the previous challenge exercise, or open I_ARCH-Challenge-CHP11.dwg.
- Set layers and create contours.
- Thaw and set current the existing layer, Topo.
- Thaw the layer, Site - Concrete.
- Draw smooth curved contours from node to node as shown.
- Calculate the square area of the lot this fire station sits on. The lot is shown with the blue grips active in the following image.
- Place a title block on the layout.
- Activate the Plan View layout.
- Insert the block Titleblock centered on the layout.
- Add text to the title block as shown.
- Add and configure two viewports.
- A view of the elevation detail at a scale of 1/8” = 1'.
- The key plan in the upper-right corner of the title block, zoomed to fit.
For each of the viewport configurations, adjust the layer display to achieve the results shown.

- Create a table showing the following Room Schedule data:
- NUMBER - NAME - AREA
- 221 - SLEEPING QUARTERS - 236 SQ/FT
- 201 - READY ROOM - 386 SQ/FT
- 202 - LOCKER ROOM - 150 SQ/FT
- 203 - EXERCISE ROOM - 383 SQ/FT
- 205 - DINING ROOM - 134 SQ/FT
- 206 - KITCHEN - 200 SQ/FT
- 207 - MEN'S TOILET ROOM - 114 SQ/FT
- 208 - WOMEN'S TOILET ROOM - 149 SQ/FT
- Save and close the drawing.
..................Content has been hidden....................
You can't read the all page of ebook, please click here login for view all page.