
Lesson 08 | Using Object Snap Tracking
In this lesson, you learn what object snap tracking is and how it can assist you in creating geometry. When you have completed the lesson, you will be able to describe and use object snap tracking to position geometry.
Object snap tracking is the most efficient way to locate a point using your existing objects as reference.
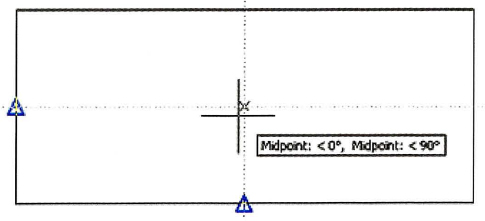
In the following image, object snap tracking is used to quickly locate the center of the rectangle.
Objectives
After completing this lesson, you will be able to:
- Describe object snap tracking.
- Use object snap tracking to position geometry.
About Object Snap Tracking
You often need to place or create geometry at a location relative to other objects in the drawing. While you could create construction geometry for the purpose of aligning the new geometry, with object snap tracking you can accomplish the same result much faster.
Object Snap Tracking Defined
Object snap tracking works in combination with object snaps to enable you to temporarily acquire and track up to seven points. Once you acquire points, object snap tracking provides horizontal, vertical, or polar alignment paths relative to the points that you have acquired.
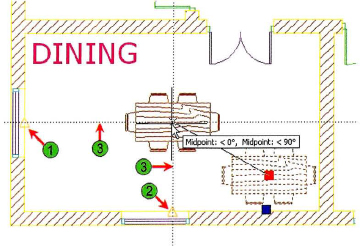
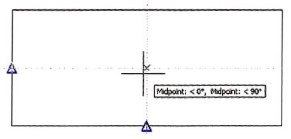
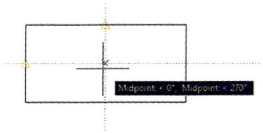
In the following image, the table is being moved to the room center using object snap tracking. To center the table in the room, the midpoint of the wall on the left (1) and the midpoint of the wall below (2) have been acquired. Triangular glyphs at the midpoints indicate that the points have been acquired. As the table is positioned near the imaginary intersection, the alignment paths (3) appear indicating the intersection. The Dynamic Input interface displays the current position as 0 degrees from the left midpoint and 90 degrees from the lower midpoint.
When you need to know the center of a noncircular object such as a rectangle or polygon, use object snap tracking to locate the center point.
Object Snap Tracking Guidelines
- Use object snap tracking to reduce the need to create construction geometry.
- You can use object snap tracking to calculate the center point of noncircular objects.
- When you use object snap tracking in conjunction with dynamic input, the Dynamic Input interface displays position information related to the acquired points.
Using Object Snap Tracking
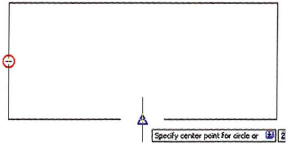
To use object snap tracking, you acquire points from geometry in the drawing using running object snaps. As you acquire points on the geometry, a small plus (+) sign appears on the point. This indicates that the point is being used for object snap tracking.
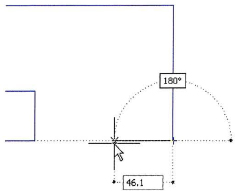
In the following image, the midpoint of the left side of the rectangle has been acquired. Notice the plus (+) symbol indicating the acquired point. The midpoint of the bottom of the rectangle is being touched to acquire the point.
Touching to Acquire a Point
To touch a point, hover over the point with your cursor, but DO NOT CLICK to select the point. The acquired indicator appears inside the object snap marker when the point has been acquired.
![]()
Command Access

Drafting Settings Dialog Box
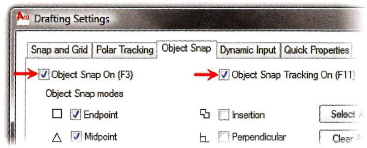
Turn Object Snap Tracking on from the status bar, from the Object Snap tab in the Drafting Settings dialog box, or by pressing F11. Object Snap must be on and modes must be selected for Object Snap Tracking to work.
In the Polar Tracking tab, you can choose whether to track Orthogonally Only (simplest method) or to Track using all polar angle settings.
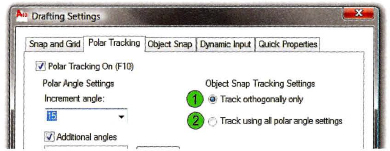
| Alignment paths only appear for horizontal and vertical alignments. | |
| Alignment paths appear for all polar angles defined. |
Tip
Press and hold SHIFT+Q to temporarily turn object snap tracking on or off.

Procedure: Using Object Snap Tracking
The following steps outline how to use object snap tracking to acquire points.
- On the status bar, make sure the Osnap and Otrack settings are on.
- Start any command that prompts you to select a point.
- To specify a point using object snap tracking, touch the point with the cursor. A small plus (+) appears, indicating that the point has been acquired.

- Touch another point to acquire its location.
- If more than two points are required, continue to touch points.
- Move your cursor to a location that would be considered an intersection of the acquired points, based on orthogonal or polar angle settings. The alignment paths appear as your cursor approaches the calculated intersection.
- Click to select the calculated point.
Guidelines for Acquiring Points with Object Snap Tracking
- To acquire a point, touch it with the cursor.
- To release a point, touch an acquired point with the cursor.
- You can acquire up to seven points for object snap tracking.
- If you attempt to acquire more than seven points, previous points are automatically released on a first-acquired, first-released basis.
Object Snap Tracking Settings Key Points
- Object snap tracking uses running object snaps to acquire points.
- To use object snap tracking, object snaps must be turned on with at least one object snap selected.
- Hover over the object snap points, but do not select them.
Practice Exercise | Object Snap Tracking
Practice using object snap tracking orthogonally.
- Begin a new drawing.
- Be sure that Object Snap and Object Snap Tracking are both selected in the status bar.

Right-click Object Snap and be sure that the Midpoint selection mode is selected.
- Draw a rectangle any size:
- On the Home tab, click Draw panel > Rectangle.
- Click the first corner; click the opposite corner.
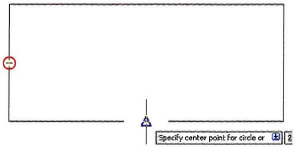
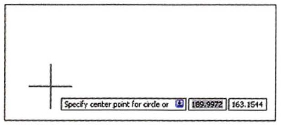
- Draw a circle (any size) in the center of the rectangle:
- On the Home tab, click Draw panel > Circle.
- Hold the mouse over the midpoint of one of the lines in the rectangle until you see a small cross.
- Then hold the mouse over the midpoint of one of the adjacent lines.
- Then bring your curser to the middle of the rectangle.
- Click at the intersection of the two dotted lines of the horizontal and polar angles.
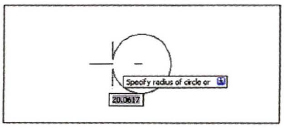
- Specify the circle size by clicking a point in the graphics window, or entering a value on the command line.
- Close all files. Do not save.