
Exercise | Use Linetypes
In this exercise, you load linetypes into the drawing and assign them to layers. You then create new geometry using the new linetypes.
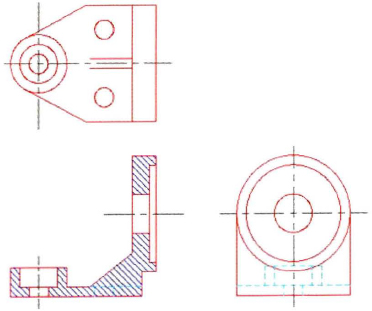
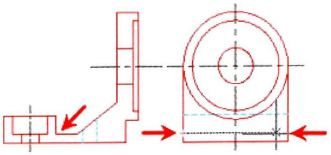
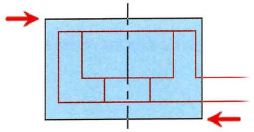
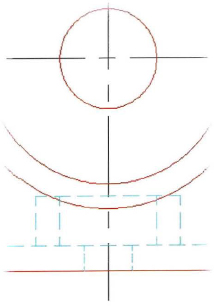
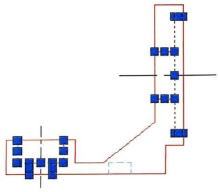
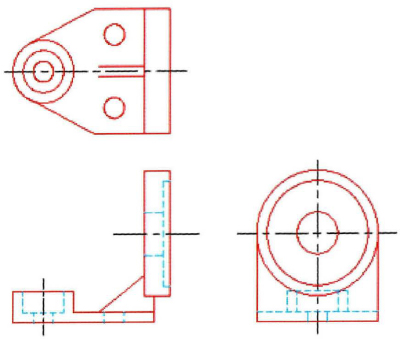
The completed exercise
Completing the Exercise
To complete the exercise, follow the steps in this book or in the onscreen exercise. In the onscreen list of chapters and exercises, click Chapter 4: Drawing Organization and Inquiry Commands. Click Exercise: Use Linetypes.
![]()
- Open M_Using-Linetypes.dwg.
- To load linetypes:
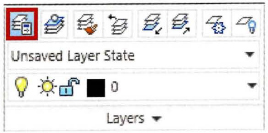
- On the Home tab, click Properties panel > Linetype list > Other.

- In the Linetype Manager dialog box, click Load.
- In the Load or Reload Linetypes dialog box, locate and click the CENTER linetype.
- Locate the HIDDEN linetype and press CTRL+click the linetype (this enables you to select more than one option from the list, but not the options in between).
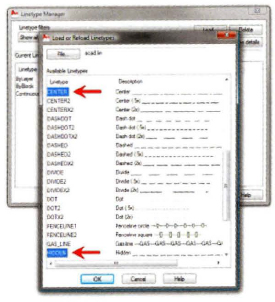
- Click OK to load the lines and to exit the dialog boxes.
- On the Home tab, click Properties panel > Linetype list > Other.
- To apply the loaded linetypes to the selected layers:
- On the Home tab, click Layers panel > Layer Properties.
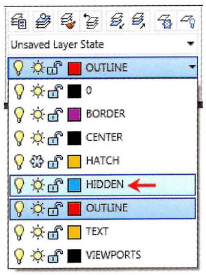
- In the Layer Properties Manager dialog box, find the CENTER layer and click the linetype field for that layer (currently Continuous).
- In the Select Linetype dialog box, click the CENTER linetype. Click OK.
- This applies the CENTER linetype to the CENTER layer.
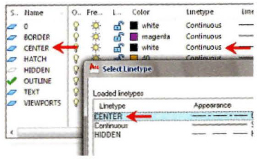
- Repeat the steps to apply the HIDDEN linetype to the HIDDEN layer.
Note: Linetypes may also be loaded from this dialog box.
- Click OK to exit the dialog box and close the Layer Properties Manager.
- On the Home tab, click Layers panel > Layer Properties.
- Notice that the centerlines now appear in the drawing. To change the linetype scale:
- On the command line, enter LTSCALE. Press ENTER.
- For the scale factor, enter .75. Press ENTER.
Notice the effect that the new linetype scale has on the centerlines.
- To create another centerline, first make the Center layer current:
- On the Home tab, click Layers panel > Make Object's Layer Current.
- Select any centerline on the drawing. The current layer should now be the Center layer.
- Start the Line command.
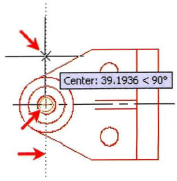
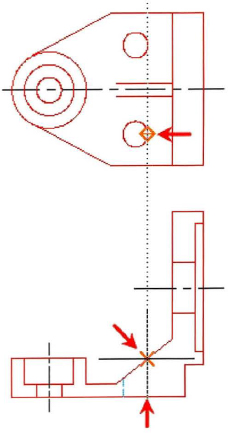
- Use object snap tracking to track a line from the center object snap above and below the object as indicated below.
- On the Home tab, click Layers panel > Make Object's Layer Current.
- Before drawing the hidden lines, make the HIDDEN layer current. Freeze the HATCH layer and select the appropriate object snap settings:
- On the Home tab, click Layers panel > Layer list. Select HIDDEN to make it current.
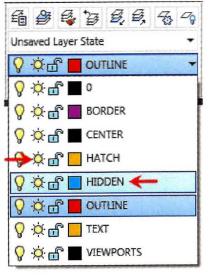
- Select the Layer List again and Freeze the HATCH layer.
- On the status bar, be sure that polar tracking, object snap, and object snap tracking are all selected.
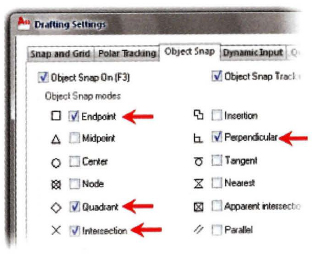
- On the status bar, right-click Object Snap. Click Settings.

- Select the Endpoint, Quadrant, Intersection, and Perpendicular object snap modes.
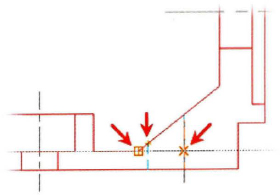
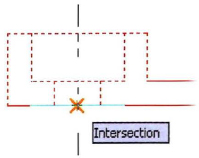
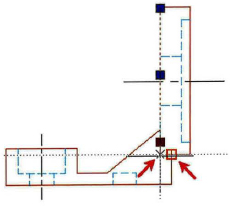
- Use the Line command to draw two line segments in the front view that track the right and left quadrants of the small circles in the top view. Draw the line segments so that they intersect the slanted line and are perpendicular to the bottom line as indicated below.
- On the Home tab, click Layers panel > Layer list. Select HIDDEN to make it current.
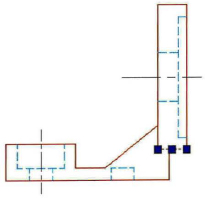
- Use the same technique to draw the hidden lines in the side view:
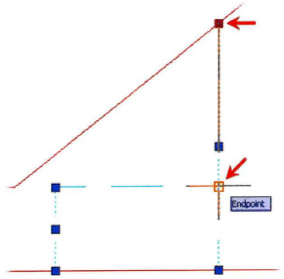
- Using the line command, track the endpoint of the corner in the front view as indicated (do not select this endpoint!).
- Drag the cursor to the side view until it intersects with the left vertical line of the object and click.
- Drag the cursor to the right side of the object to draw the line perpendicular to the right vertical line and click.
- Press ENTER to complete the line command.
- Repeat to create the other horizontal line using the adjacent corner in the front view.
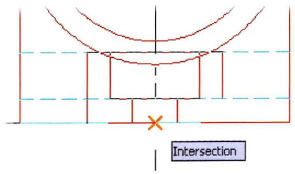
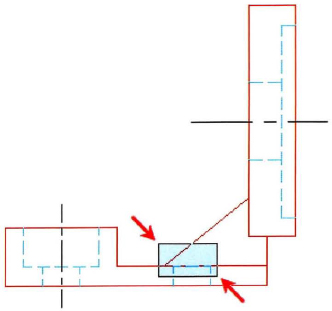
- To refine the hidden hole detail in the front view:
- Zoom to this area.
- Trace the endpoint of the inside corner (DO NOT click the endpoint).
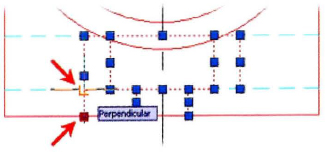
- Drag the cursor until it intersects with the vertical hidden line and click.
- Drag the line until it is perpendicular with the vertical hidden line to the right and click.
- Zoom in closer to view the hidden line segments.
- With the command line blank, select the vertical lines.
- Drag the upper endpoints down to the endpoints or perpendicular to the horizontal line.
- To refine the hidden hole detail in the side view, you copy lines from the front view and modify them:
- Start the Copy command.
- Window select from left to right to select the hole detail in the side view.
- Press ENTER to complete the selection.
- Click the intersection of the centerline and the bottom line in the front view the base point.
- Drag the copied objects to the right. Click the intersection point of the centerline and bottom line in that view.
- Press ENTER to complete the Copy command.
- To change the linetypes and modify the copied lines:
- With the command line blank, select the lines that you just copied.
- Click the lower grip in the line segment on the left. Drag it perpendicular to the horizontal line as indicated.
- With the objects still selected, on the Home tab, click Layer Control list > Hidden.
- Press ESC to deselect all lines.
The previously selected lines should all be on the HIDDEN layer.
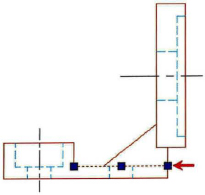
- With the command line blank, select the upper hidden horizontal line.
- Select the endpoint on the right and drag it to the endpoint object snap of the vertical hidden line as indicated below. Use the intersection or perpendicular object snap mode.
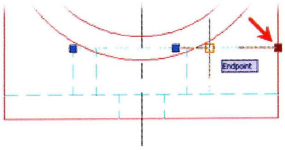
- Repeat this for the opposite endpoint.
- To change the linetype scale of the selected line segments:
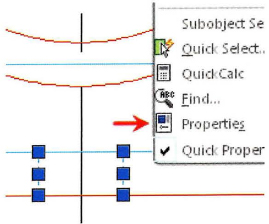
- With the command line blank, select the two short hidden line segments as indicated below.
- Right-click and select Properties.
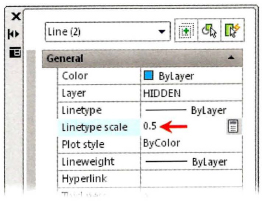
- In the Linetype scale field, enter .5.
- Press ENTER to apply this change to the selected lines.
- Click the X in the upper left corner of the Properties dialog box to close it.
- Press ESC to deselect the line segments.
- Observe that the linetype scale changes to the scale of the previously selected lines.
- To convert other lines to the HIDDEN layer:
- To complete this side view, it will no longer be a section view. Modify the lines accordingly:
- With the command line blank, select the vertical line as indicated below.
- Click the lower grip and use object tracking to track the inside corner as indicated.
- Press ESC to deselect the line and grips.
- To adjust the horizontal lines:
- With the command line blank, select the line that is indicated below.
- Select the left grip and drag it to the newly located endpoint of the vertical line.
- Press ESC to deselect the line, then click the other horizontal line that is indicated below. Select the right endpoint grip and drag it so that the line is perpendicular to the vertical line to its right.
- To delete the underlying line segment:
- With the command line blank, use a window to select the short line segment, clicking from left to right.
- Use the Erase command or press DELETE.

Note: It is important to pay attention to the lines that are on top of other lines and delete those that are not necessary.
- With the command line blank, use a window to select the short line segment, clicking from left to right.
- To erase the hatch pattern that is no longer necessary:
- Close all files. Do not save.
..................Content has been hidden....................
You can't read the all page of ebook, please click here login for view all page.