
Lesson 06 | Using Object Snaps
In this lesson, you learn what object snaps are, why they are important, and how to use them effectively in your drawing. You will be able to explain what object snaps are including the difference between running object snaps and object snap overrides. You will also be able to use objects snaps to select snap points in the drawing.
You will use object snaps for all drawing and most editing operations. Using object snaps is the best way to ensure the accuracy of all of your objects.
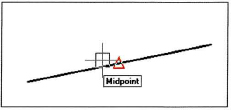
In the following illustration, the image on the left shows a door placement that used an object snap to place the door. The image on the right shows what the door placement looks like if you do not use an object snap.

Objectives
After completing this lesson, you will be able to:
- Explain what object snaps are and why they are used.
- State the difference between running object snaps and object snap overrides and identify the different Object Snap modes.
- Use running object snaps and object snap overrides to select snap points in the drawing.
About Object Snap
Every object you create has various selectable points that you can use to position other objects. Every time you create an object you are required to specify a point or location. It is critical that these points be defined accurately if you expect your drawing to be accurate.
Object Snaps Defined
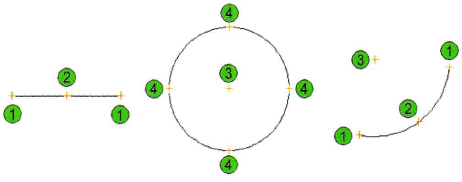
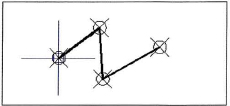
The following image shows three of the most basic types of objects that you can create: a line, a circle, and an arc. In this example, the line has two unique snap types with three possible locations that you can select; the circle has two unique snap types with five possible locations that you can select; the arc has three unique snap types with four possible locations that you can select.
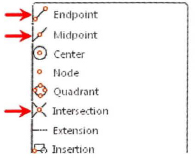
- Endpoint
- Midpoint
- Center point
- Quadrant
Object snaps exist for each of the previously mentioned points and more. You use them to select those points accurately. Attempting to accurately select these points without using object snaps would be very time-consuming and inaccurate.
Effect of Using Object Snaps
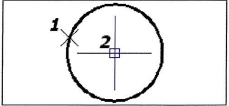
In the following image, the smaller circle needs to be concentric within the larger circle. By using the Center object snap, you can place the smaller circle precisely in the center of the larger circle.
By examining each circle's coordinates, you can verify that they both share the same center point.
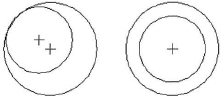
Effect of Not Using Object Snaps
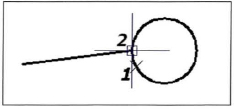
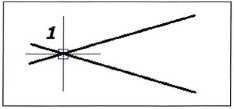
In the following image, the user attempted to create the vertical line at the endpoint of the horizontal line without using objects snaps. Under normal viewing circumstances, the lines appear to be connected correctly; however, after zooming in to the geometry, you can see that the lines are not connected at the endpoints.
Object Snap Key Points
- Using object snaps to place objects in relation to other objects in the drawing is critical for accuracy.
- Every object you can create contains at least one point that is selectable with an object snap.
Object Snaps
You can access object snaps using several different methods. Running object snaps are generally set and then turned on or off, while object snap overrides represent a one-time use of the selected object snap.
- Running object snaps refer to object snaps that are set and available when the Osnap setting is on.
- Object snap overrides refer to an object snap that you select manually via the toolbar, shortcut menu, or command line. The object snap remains in effect until you specify the next point.
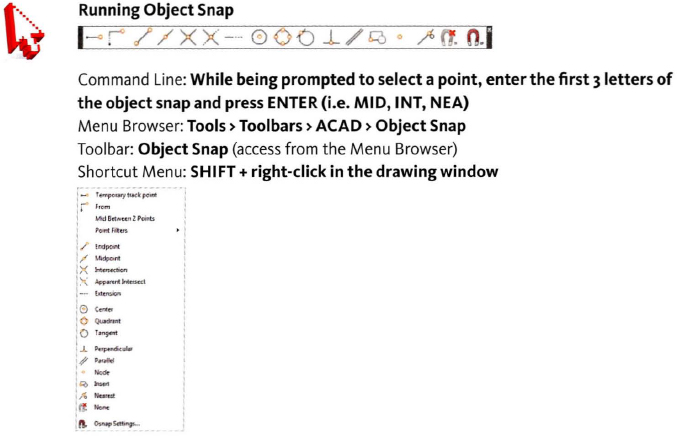
Running Object Snap
If you need to use the same object snap repeatedly, you can set it as a running object snap, which means it stays on until you turn it off. For example, you might set the object snap to center if you need to connect the centers of a series of circles with a line. This feature increases speed and accuracy.
Another feature of running object snap is that multiple object snaps can be on at the same time.
Command Access
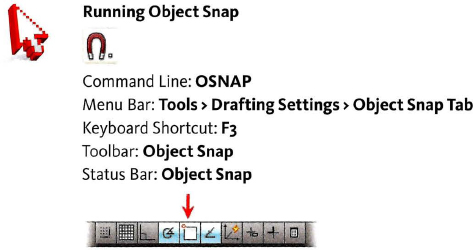
Object Snap Settings
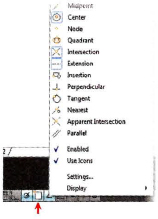
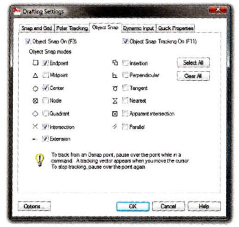
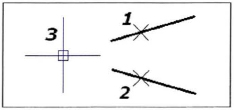
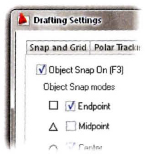
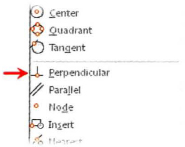
The quickest way to turn Running Object Snap on or off is from the status bar button (1). If you right-click on this button, you can select Settings (2) to change the object snap options in the Drafting Settings dialog box (shown below). You can also select the snap modes from the shortcut menu. A selected object snap mode will be highlighted (3).
Notice that information in the Object Snap tab of the Drafting Settings dialog box is similar to the shortcut menu shown above.
Next to each available object snap is an icon referred to as the AutoSnap marker. If AutoSnap is turned on, the marker appears whenever you move the cursor over a snap point. Press TAB to cycle through the available snap points. Never turn all the object snap modes on at once. It is better to have several object snaps chosen (such as Endpoint, Midpoint and Intersection) and go back to add others as needed or use the object snap override.

When Are Object Snaps Available
You can specify an object snap whenever the software prompts for a point.
![]()
Object Snap Override
Object Snap override means that the snap stays in effect until you specify the next point. You are in snap override mode if you click an object snap from the shortcut menu or the object snap toolbar before selecting the specified point.
Command Access
Object Snap Modes
Note that an object snap override will cancel:
- If you miss your mark.
- If you select an object snap twice before selecting your point.
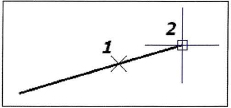
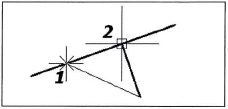
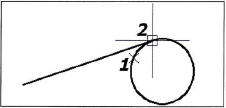
In the following examples:
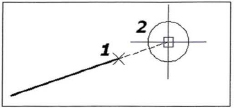
- Point 1 identifies the initial point used to select the object.
- Point 2 identifies the point snapped to, or the second pick point if it is required.
- Point 3 identifies the point snapped to if two pick points were required.

Using Object Snap
When you turn on multiple running object snaps, the software uses the object snap most appropriate to the object you select. If two potential snap points fall within the selection area, the software snaps to the eligible point closest to the center of the target box.
You can add to or subtract from your object snap modes without exiting a current command. Right-click OSNAP on the status bar and then click Settings. Add additional modes or remove modes. When you click OK, you return to the drawing area and can continue creating your design.
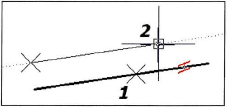
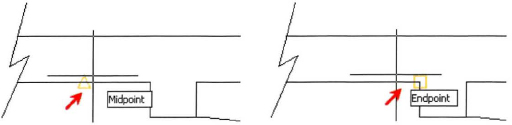
In the following illustration, the image on the left shows the cursor closer to the midpoint of the line; therefore, the midpoint will be selected. On the right, the cursor is closer to the end of the line; the endpoint will be selected.
Cycling Through Multiple Object Snaps
If the Dynamic Input interface is turned off, you can press TAB to cycle through multiple valid object snaps while touching an object.

Procedure: Using Running Object Snaps
The following steps are an overview of using running object snaps.
- On the status bar, right-click Object Snap. Click Settings.
- In the Drafting Settings dialog box, verify that some of the object snaps are selected and Object Snap On (F3) option is selected. Click OK.
- On the Home tab, click Draw panel > Line. Place the cursor near other geometry in the drawing. The AutoSnap marker appears as your cursor approaches a snap point.
- Click to select the snap point, then move the cursor to the next point on the screen. As you approach a snap point, the AutoSnap marker appears near the cursor. Click to select the snap point.
Tip
If you are using a three-button mouse or a wheel mouse, you can set the default behavior for the middle button or wheel to activate the Object Snap shortcut menu. Do this by setting the MBUTTONPAN system variable to 0.
- On the command line, enter MBUTTONPAN. Press ENTER.
- Enter 0.
- Press ENTER.

Procedure: Using Object Snap Overrides
The following steps are an overview of how to use the object snap overrides.
- Begin creating or editing geometry.
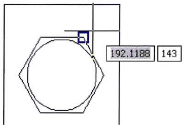
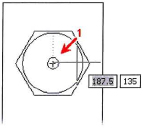
- When the software prompts you to select a point, select an object snap from the shortcut menu. Then position your cursor near the object containing the snap point. The AutoSnap marker should appear (1), indicating the snap point. Click to select the point.
- SHIFT+right-click and select the object snap from the shortcut menu.
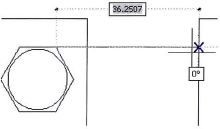
- Move your cursor to the next object. The AutoSnap marker appears next to the snap point

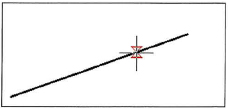
AutoSnap Aperture
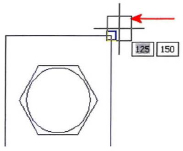
You can use the AutoSnap aperture box to inform you when object snaps are active. By default, this option is turned off. The following image shows the AutoSnap aperture box. When any portion of the aperture box touches an object with a valid snap point, the AutoSnap marker appears, indicating a selectable snap point.
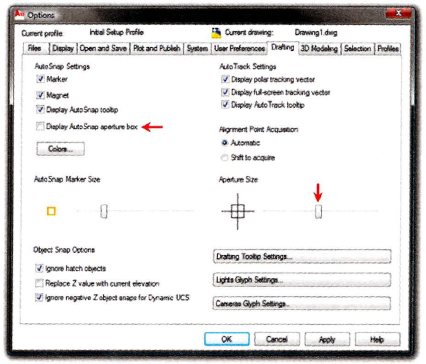
Options Dialog Box: Drafting Settings Tab
Under AutoSnap settings, place a check mark in the box next to the AutoSnap Aperture box.
Under Aperture Size, adjust the aperture size by dragging the slider left or right. You can see a preview of the size to the left of the slider. Hint: These kinds of adjustments work well just left of center on the sliding adjustment bar.
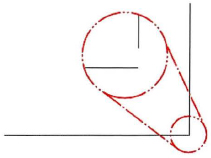
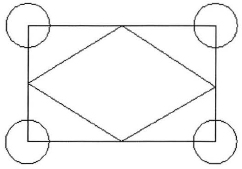
Practice Exercise | Running Object Snap and Object Snap Overrides
In order to practice using running object snap and object snap overrides, you create this drawing two times. The first time, do this drawing with the Running Object Snap option turned on. The second time, turn it off and use the overrides by selecting the object snap each time before you pick your point.
- Begin a new drawing.
- Be sure that the object snap is on.
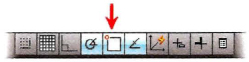
Right-click and check Endpoint, Midpoint, and Intersection.
- Draw a rectangle (any size):
- On the Home tab, click Draw panel > Rectangle.
- Click to specify the first corner.
- Drag your mouse and click to specify the other corner.
- Draw four circles the same size with the center points at each corner of the rectangle:
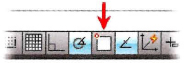
- On the Home tab, click Draw panel > Circle.
- For the center point of the circle, click the intersection (or endpoint) of the lines at a corner.
- Make your first circle (any size).
- Press ENTER to repeat the Circle command.
- Click the endpoint of a line at another corner
- Press ENTER to accept the default size [which will be in brackets]
- Repeat for the other two circles.
- Draw four connecting lines from the midpoint of each line in the rectangle:
- On the Home tab, click Draw panel > Line.
- Move the mouse to the midpoint of a line on the rectangle.
- Click when you see the Midpoint object snap marker.
- Move the mouse to the midpoint of the adjacent line and click when you see that Midpoint marker.
- Repeat for the remaining lines.
- Erase everything. Begin this drawing again. This time turn object snap off.
- First, draw the rectangle (any size), then create the same drawing as before using the single object snap overrides. To draw the circles:
- On the Home tab, click Draw panel > Circle.
- Before you specify the center point of the circle, SHIFT+right-click and select Endpoint.
- Click the Endpoint of the line.
- Make the circle any size and repeat these steps for the other three circles.
- To draw the four connecting lines from the midpoint of each line in the rectangle:
- On the Home tab, click Draw panel > Line.
- SHIFT+right-click and select Midpoint from the shortcut menu.
- Move the mouse to the midpoint and click when you see the Midpoint object snap marker.
- Continue with the Line command. SHIFT+right-click and select Midpoint from the shortcut menu and move the mouse to the midpoint of the adjacent line. Click when you see that marker.
- Repeat these steps for the remaining lines.
Though it is far easier and quicker to use running object snap, it is also convenient to occasionally use the object snap overrides. In this exercise, you turned object snap off to do the second drawing, however note that it can be left on when the object snap overrides are needed.
- Close all files. Do no not save.