
Lesson 36 | Using Text Styles
This lesson describes how you can use text styles to control text appearance.
In a typical design environment, there can be several designers creating drawings. If each designer were to choose their own text fonts for annotation, the resulting drawings would lack a uniform appearance. Using text styles can help to create a consistent appearance across drawings by providing predefined text formats.
Objectives
After completing this lesson, you will be able to:
- Explain the purpose of text styles.
- Create and use text styles.
Text Styles
Text styles provide an easy way for you to control the default appearance of text. Each text object contains properties such as font, height, width factor and oblique angle. Using text styles, you can predefine each of these properties, resulting in a uniform appearance of text objects that use the same style.
Another benefit of using text styles is that you can update all text in the drawing that uses a certain style simply by changing the style.
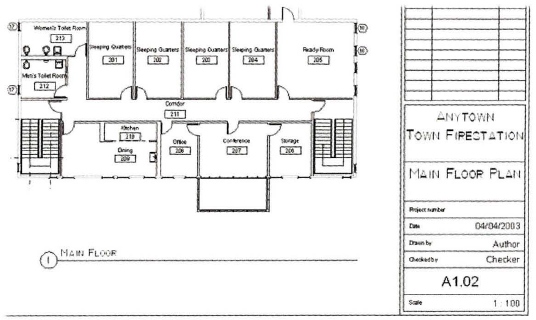
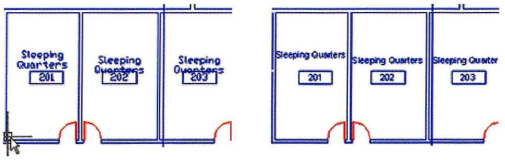
The following image illustrates the effect of changing a text style when it is being referenced by text objects. In the floor plan on the right, the text style uses a smaller font so that the text objects better fit the space.
Text Styles Defined
A text style is a collection of common text properties used by one or more text objects in the drawing. You generally create several text styles. For example, you could have a text style for dimensions, another for view labels, and another for title blocks or general drawing annotation.

Example of Text Styles
On a typical drawing, you might have one style defined for all of your general notes, text and dimensions, another style for object labels, and another style for the title block information.
Text Style Key Points
- A text style is a collection of predefined text properties such as font, height, width factor, and oblique angle.
- You create text styles to keep a uniform appearance of text objects in the drawing.
- You can update all text in the drawing that uses a certain style simply by changing the style.
- You generally create several text styles for objects such as dimensions, view labels, your title block or general drawing annotation.
Creating and Using Text Styles
You use the Style command to create and manage text styles. By default, all new drawings contain two text styles, one named Standard and one named Annotative. Standard is the current text style for all new drawings, unless you base a new drawing on a template that has another style set as the current style.
Creating and Using Text Styles
Text styles are similar to layers in that they are used to organize objects in the drawing. You create a Text Style and make it current so that the text you enter appears in that style. You can also change the Text Style of selected text after it was placed in the drawing.
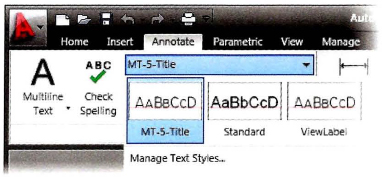
To create text styles, you use the Text Style dialog box. To switch from the current text style to another, you can select a text style from the list on the Text panel the same way you can make a Layer current from the Layer Control list. Similarly, you can assign a text style to selected text from the text style list.
Command Access
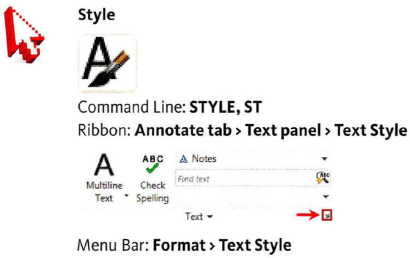
Text Style Dialog Box
You use the Text Style dialog box to create and manage text styles.

| Use this area to view your current text Styles. You can also edit a selected style or rename it. | |
| Select a Font Name from the list of available fonts. Apply a Font Style such as Bold or Italic if required. | |
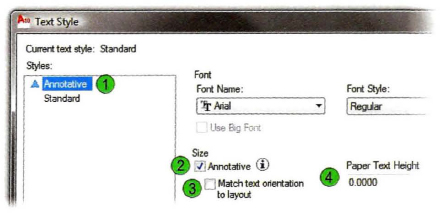
| Specify the size of your text in this section. If you choose to make your text Size Annotative, the Height field changes to Paper Text Height. Enter the Paper Text Height you want to appear in all your layout viewports for text created with this style regardless of the viewport scale. | |
| Select any Effects to apply to the text such as Width Factor and Oblique Angle. A Width Factor of 1 is normal. Less than 1 would make the text narrow and greater than 1 would make the text wide. |
Applying Height to the Text Style
When you set the text height, it becomes the default value for text created with that style. If this value is 0, you will be prompted to specify the text height each time you create Single Line Text. When using the Multiline Text command, the text height can be chosen or typed from the list in the Text panel.
![]()
Annotative Property
You can choose the Annotative Style (1) or assign the Annotative property (2) to a text style when you want the text height to display and plot the same size in the drawing layout, regardless of the viewport scale.
You can Match the text orientation to the layout (3) so that the text objects display horizontal if the view is, for instance, isometric.
When Annotative is selected, the Height property changes to Paper Text Height (4). Enter a value other than zero to set the height for all the text that utilizes this style. The text in the viewports is automatically scaled to the paper height size in the drawing layout.
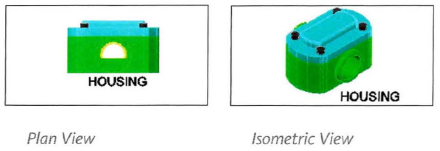
Example of Text Oriented to Layout
In the following images, two views are shown on the layout. In the first view, the text appears in the same orientation that it was created, which is normal to the plan view and layout. In the second image, the view was changed to isometric, but the text remains oriented to the layout.
Setting Height in the Text Style
When you set a value for Height (Paper Text Height for annotative styles) in the text style, it becomes the default value for all text created with that style. Then, when you create a single line text object using the Text or Dtext commands, you are not prompted for a paper height. Leave this option set to 0 if you want to be prompted for the paper height when using the Text or Dtext commands.
![]()
Procedure: Creating and Using Text Styles
The following steps give an overview of creating and using text styles.
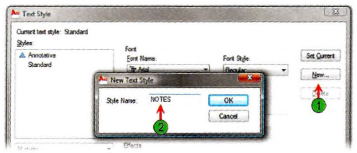
- Start the Style command.
- Select New (1) and enter a New Text Style Name (2). Click OK.
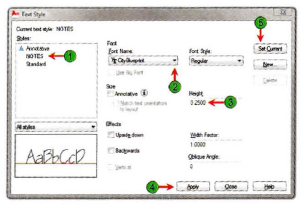
- Select the new style (1), assign a Font Name (2), a Height (3), Apply (4) and Set Current (5). Then Close the dialog box.
- Begin the Text command.
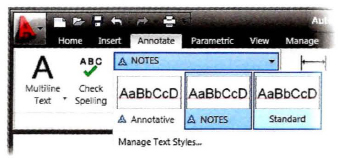
- To change from one text style to another, choose the Text style from the list.
- To assign a Text Style to existing text objects:
- With the Command Line blank, select the objects.
- Select the text style from the list.
- Press ESC to deselect the text objects.
Redefining Styles
If you redefine a style to be annotative or nonannotative, the objects that used that style are not automatically updated. You can use the Annoupdate command to update the objects to the new style, or change them using the Properties palette.
![]()
Text Style Guidelines
- The default text style for all new drawings is Standard unless the new drawing is based on a template with a different default style.
- All text is assigned to a text style. If you do not create any new text styles, all text is assigned to the Standard text style.
- The default font for the Standard style is Arial.
- You cannot delete or rename the Standard text style.
- If you copy and paste text from another drawing or insert a block into a drawing that has the same Text Style name with different properties, the text properties of the host drawing will take precedence.
- Changes made to a text style affect all text objects using the style.
- The software uses two types of fonts: Line fonts (*.shx) and True Type fonts (*.ttf).
- Create only the number of text styles necessary to keep the text properties in a drawing consistent.
- Delete text styles that are not being used in the drawing.