Exercise | Create a Dimension Table
In this exercise, you create a new table style using the Tablestyle command. You create a new table containing tabulated dimensions for the design. You enter static values in the table as well as a formula that you copy to other cells.

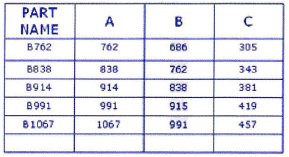
The completed exercise
Completing the Exercise
To complete the exercise, follow the steps in this book or in the onscreen exercise. In the onscreen list of chapters and exercises, click Chapter 11: Creating Additional Drawing Objects. Click Exercise: Create a Dimension Table.
![]()
- Open M_Create-Table.dwg.
- To create a new table style and make it current:
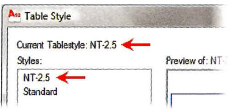
- On the Annotation panel (or Annotate tab > Tables panel), click Table Style.
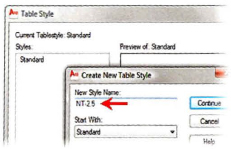
- In the Table Style dialog box, click New.
- In the Create New Table Style dialog box, enter NT-2.5.
- Click Continue.
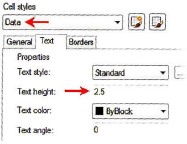
- To specify text height for data cells:
- Click the Data Cell style.
- Click the Text tab.
- For Text Height, enter 2.5.
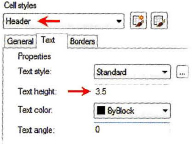
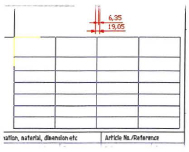
- To specify the text height for column cells:
- Click the Header cell style.
- Click the Text tab.
- For Text Height, enter 3.5.
- Click OK.
- To make the new table style current:
- In the Table Style dialog box, double-click the new style.
- Click Close.
- To place a table in the drawing:
- Start the Table command.
- In the Insert Table dialog box, under Insertion Behavior, click Specify Insertion Point.
- Under Column & Row Settings, adjust the options as shown.
- Under Set Cell Styles, adjust the options as shown to create a table with no title row.
- Click OK.
- Specify an insertion point for the table as shown.
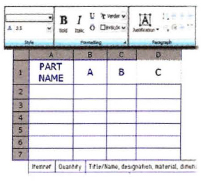
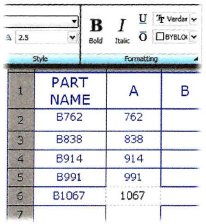
- The In-Place Text Editor appears with the first cell in the table ready for editing:
- Enter PART NAME and press TAB. Tip: Press ALT+ENTER to create a second line in the cell.
- Enter A and press TAB.
- Enter B and press TAB.
- Enter C and press TAB. Your table should appear as shown.
Note: If you need to move the table, select the table, and then move it by selecting the top corner grip.
- Zoom in to the table.
- To add additional data to the table cells:
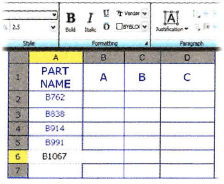
- Double-click the empty cell under PART NAME.
- Enter B762, and then press DOWN ARROW.
- Continue entering values in the cells as shown, pressing DOWN ARROW to move to the cell below.
- Continue entering values in the table:
- After entering the data in the last row, press TAB to move to the next column.
- Press UP ARROW to move to the top of the table.
- Enter the values as shown for Column A.
Tip: The numbers are the same as the PART NAME column without the B prefix.
- Enter a formula in a cell:
- Press TAB to move to the last row in the next column.
- Enter =B6-76. This subtracts 76 from the value of cell B:6.
Note: Do not confuse the labels in the table with the actual cell letter or number. Functions must reference the actual cell location.
- Click OK to close the In-Place Text Editor.
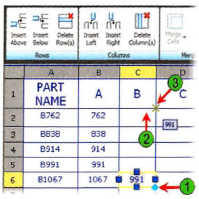
- To copy the contents of one cell to others:
- Click the cell containing the formula to highlight it.
- Click the Auto-Fill grip (1).
- Move your cursor upward (2).
- Click anywhere in the top cell (3).
The copied formula is pasted into the other cells, maintaining reference to relative cell numbers.
- Press ESC to clear the selection.
- To add the remaining data to column C:
- Double-click the first cell in the last column.
- Enter the values as shown.
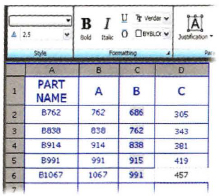
- Compare the values in your table to the values shown.
- Zoom to the drawing extents.
- Close all files without saving.