Exercise | Array Objects in the Drawing
In this exercise, you create polar and rectangular arrays of various pieces of office furniture in an office floor plan. When you have completed the exercise, you will be able to use the Array command to create arrays of objects in your drawings.
Note
You have the option of completing this exercise using either imperial or metric units. Select one version of the exercise to complete the steps.
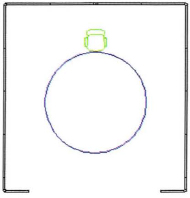
![]()
The completed exercise
Completing the Exercise
To complete the exercise, follow the steps in this book or in the onscreen exercise. In the onscreen list of chapters and exercises, click Chapter 3: Manipulating Objects. Click Exercise: Array Objects in the Drawing Metric.
![]()
Exercise: Array Objects in the Drawing (Metric Units)
- Open M_Creating-Arrays.dwg.
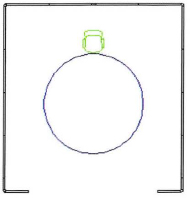
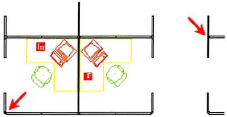
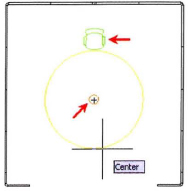
- To create a polar array, zoom into the area shown in the following image.
- To create an array of the chair around the table:
- On the Home tab, click Modify panel > Array.
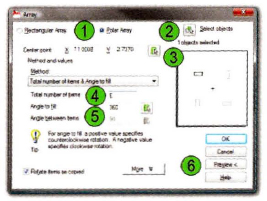
- In the Array dialog box, click Polar Array (1).

- Click Select Objects (2). Select the chair.
- Press ENTER to return to the dialog box.
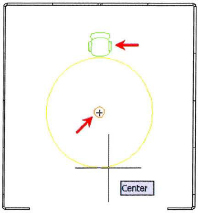
- Click the Center point button (3).
- With Object Snap on, select the center of the table.
- For the total number of items (4), enter 6.
- For the angle to fill (5), enter 360.
- Click Preview (6).
- Do not press ENTER. Press ESC to return to the dialog box.
- Change the total number of items:
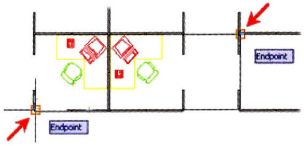
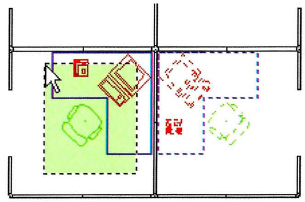
- Zoom to display the area that is indicated in the following image. Make certain that the walls are visible.
- Use the Rectangular array option to populate the remaining offices with the objects from the first two:
- On the Home tab, click Modify panel > Array.
- In the Array dialog box, click Rectangular Array.
- Click the Select Objects button.
- Select the objects indicated in the following image. Press ENTER.
Note: Use two separate crossing windows to select the objects.

- Set your desired number of rows and columns:
- Specify the unit cell as indicated:
- Click the endpoint of the line of the lower interior wall.
- For the other corner, click the endpoint of the line of the upper interior wall.
- Click Preview.
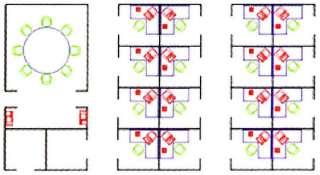
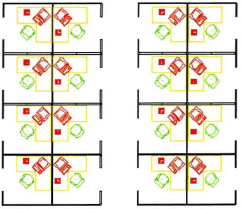
- Your rectangular array should appear as illustrated.
- Do not press ENTER.
- Use the wheel on the mouse to adjust the display of your drawing.
- If necessary, press ESC to return to the dialog box and reselect the unit cell, or press ENTER to complete the Array command.
- Close all files. Do not save.
Exercise: Array Objects in the Drawing (Imperial Units)
- Open I_Creating-Arrays.dwg.
- To create a polar array, zoom into the area shown in the following image.
- To create an array of the chair around the table:
- On the Home tab, click Modify panel > Array.
- In the Array dialog box, click Polar Array (1).
- Click Select Objects (2). Select the chair.
- Press ENTER to return to the dialog box.
- Click the Center point button (3).
- With Object Snap on, select the center of the table.
- For the total number of items (4), enter 6.
- For the angle to fill (5), enter 360.
- Click PREVIEW (6).
- Do not press ENTER. Press ESC to return to the dialog box.
- Change the total number of items:
- In the Array dialog box, enter 8 for the total number of items (4).
- Click OK to complete the polar array.
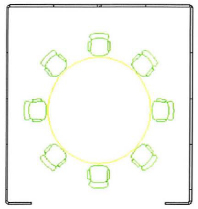
- Eight chairs are arrayed around the table as in the following illustration.
- Zoom to display the area that is indicated in the following image. Make certain the walls are visible.

- Use the Rectangular array option to populate the remaining offices with the objects from the first two:
- On the Home tab, click Modify panel > Array.
- In the Array dialog box, click Rectangular Array.
- Click the Select objects button.
- Select the objects that are indicated in the following image. Press ENTER.
Note: Use two separate crossing windows to select the objects.
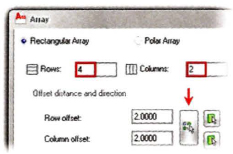
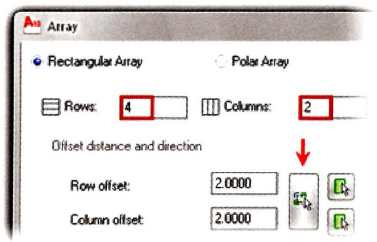
- Set your desired number of rows and columns:
- In the Array dialog box, for Rows, enter 4.
- For Columns, enter 2.
- Under Offset Distance and Direction, click Pick Both Offsets.
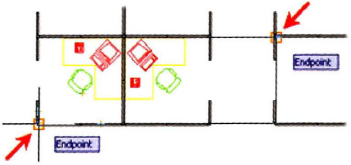
- Specify the unit cell as indicated:
- Click the endpoint of the line of the lower interior wall.
- For the other corner, click the endpoint of the line of the upper interior wall.
- Click PREVIEW.
- Your rectangular array should appear as illustrated.
- Do not press ENTER.
- Use the wheel on the mouse to adjust the display of your drawing.

- If necessary, press ESC to return to the dialog box and reselect the unit cell, or press ENTER to complete the Array command.
- Close all files. Do not save.