
Exercise | Create Basic Objects
In this exercise, you create a simple mechanical bracket using the basic geometry commands such as Line, Circle, Arc, Rectangle, and Polygon.
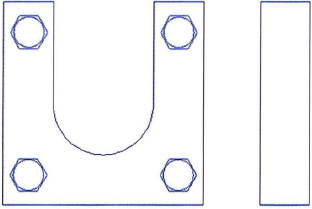
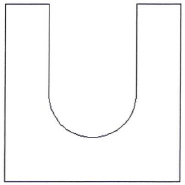
The completed exercise
Completing the Exercise
To complete the exercise, follow the steps in this book or in the onscreen exercise. In the onscreen list of chapters and exercises, click Chapter 2: Creating Basic Drawings. Click Exercise: Create Basic Objects.
![]()
Practice Creating Basic Objects: Part 1
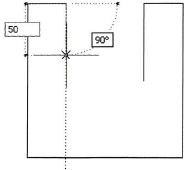
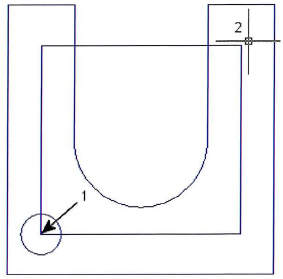
In this part of the exercise, you begin to draw the front view of the bracket, beginning at point (1) and ending at point (2). Then, you resume drawing from point (1) to point (3).
- Open M_Create-Basic-Objects.dwg.
- On the status bar, make sure the following settings are on:
- Polar tracking
- Object snap
- Object snap tracking
- Dynamic input

- To begin the line at point (1):
- On the Home tab, click Draw panel > Line.
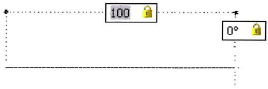
- Enter 100,50. Press ENTER.
- Enter 100. Press TAB.
- Enter 0
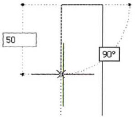
The values should appear in the Input interface as shown in the following image. Note: The values should appear in the Input interface as shown in the following image.
- Click to create the line.
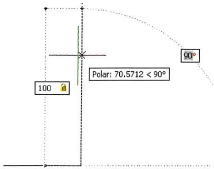
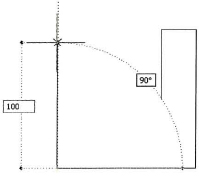
- To draw a second line perpendicular to the first:
- Drag the cursor upwards and enter 100. Press TAB.
- Make sure the angle field displays 90 degrees, then click to draw the line.
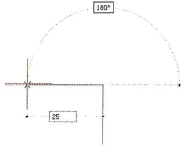
- To draw another line:
- Drag the cursor to the left making sure that the angle field displays 180 degrees.
- Enter 25. Press ENTER.
Note: Using direct distance entry in combination with dynamic input provides you with optimal flexibility in creating your drawings.
- To draw another line:
- Drag the cursor downward making sure that the angle field displays 90 degrees.
- Enter 50. Press ENTER.
- Press ENTER again to finish the line command at point (2).
- To undo all the lines that you just drew:
- On the Quick Access toolbar, click Undo.
- Notice that all of the lines that you created in the previous steps are removed.
- To redo the lines:
- On the Quick Access toolbar, click Redo.

- Notice that all of the lines removed with the Undo command are returned.
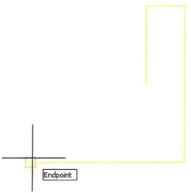
- To draw a line using object snaps:
Note: Object snaps are points on objects which enable you to accurately position other objects. They are covered in detail in another lesson.
- On the Home tab, click Draw panel > Line.
- As you approach the endpoint of the line, the endpoint object snap marker should appear.
- Click to select the endpoint of the line.
- To draw a line perpendicular to the last:
- Drag the cursor upward making sure that the angle field displays 90 degrees.
- Enter 100. Press ENTER.
- To draw a line and correct a mistake using the Undo command:
- Drag the cursor to the right making sure the angle field displays 0 degrees.
- Enter 35. Press ENTER.
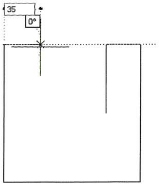
- Right-click near your last point. Click Undo.
- Because you are still in the Line command, only the last line segment that you drew is removed.
- Drag the cursor to the right again, making sure that the angle field displays 0 degrees.
- Enter 25. Press ENTER.
- To draw a line perpendicular to the last:
- Drag the cursor downward, making sure that the angle field displays 90 degrees.
- Enter 50. Press ENTER.
- Press ENTER to exit the Line command. Proceed to part two of this exercise.
Practice Creating Basic Objects: Part 2
In this part of the exercise, you draw the arc (1) in the front view of the bracket and add the side view (2). You then place the circles and polygons (3) in the four corners of the front view.
- Now draw the arc:
- On the Home tab, click Draw panel > Arc.
- Select the endpoint of the previous line.
- Press DOWN ARROW and click End on the shortcut menu.
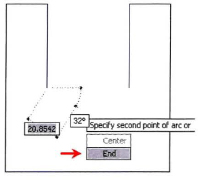
- Select the endpoint on the right side of the opening.
- To finish the arc:
- Drag the cursor to the left, making sure that the angle field displays 180 degrees.
- Enter 25. Press ENTER.
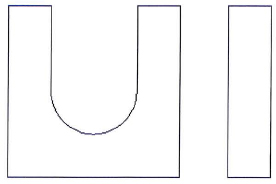
- Your drawing should now appear as shown.
- Click File menu > Save.
Tip: You should develop a habit of saving files often.
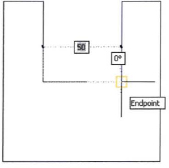
- To draw a rectangle:
- On the Home tab, click Draw panel > Rectangle.
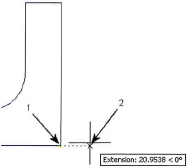
- Touch (DO NOT CLICK) point (1) as indicated in the following image.
- Drag the cursor to the right. The extension object snap draws a dashed extension line.
- Click near point (2).
- To position the rectangle:
- Right-click near your first point and select Dimensions on the shortcut
Note: This specifies the Dimension option of the Rectangle command.
- For the length, enter 25. Press ENTER.
- For the width, enter 100. Press ENTER.
- Click in the upper right of the drawing to position the rectangle.
Your drawing should now appear as shown in the following image.
- Right-click near your first point and select Dimensions on the shortcut
- To draw a circle:
- On the Home tab, click Draw panel > Circle.
- Enter 112.50,65. Press ENTER.
- In the Dynamic Input Radius field, enter 7.5. Press ENTER.

- To draw a rectangle:
- On the Home tab, click Draw panel > Rectangle.
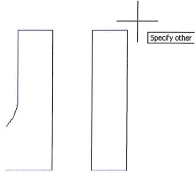
- Select the center point of the circle (1).
Note: The object snap marker should appear as you approach the center of the circle.
- Drag the cursor to the upper right (2) and enter 75,70. Press ENTER.
- Your drawing should appear as shown.
- To draw three more circles as shown:
- On the Home tab, click Draw panel > Circle.
- Create three circles, each with a 7.5 unit radius, using the corners of the rectangles as center points.
Tip: The software stores the last radius that you entered. If the command prompt is reading <7.500> you can press ENTER to reuse that value for the radius.
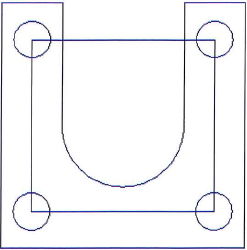
- On the Home tab, click Modify panel > Erase. Select the rectangle that was used to position the circles. Press ENTER.
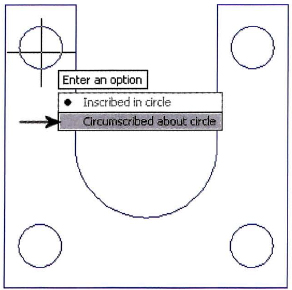
- To draw a polygon circumscribing the top left circle:
- On the Home tab, click Draw panel > Polygon.
- When prompted for the number of sides, enter 6.
- Select the center of the top left circle.
- In the Dynamic Input menu, select Circumscribed About Circle.
- For the radius, enter 8. Press ENTER.
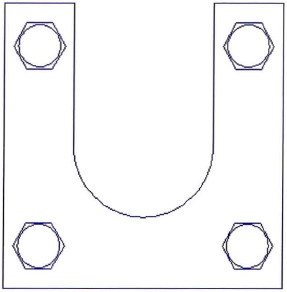
- To create three similar polygons circumscribing the other circles:
- Press ENTER to repeat the Polygon command.
- Create three additional polygons on the remaining circles as shown.
- Close all files. Do not save.