
Exercise | Create Dimensions
In this exercise, you create several types of dimensions using the appropriate dimension commands.
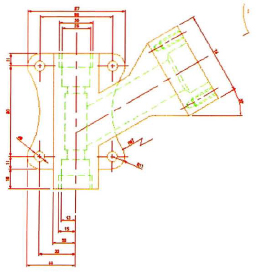
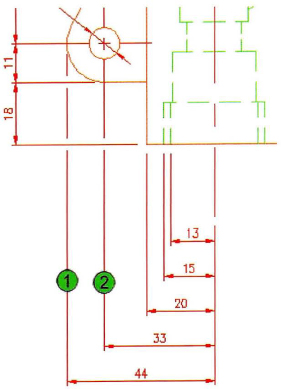
The completed exercise
Completing the Exercise
To complete the exercise, follow the steps in this book or in the onscreen exercise. In the onscreen list of chapters and exercises, click Chapter 8: Dimensioning. Click Exercise: Create Dimensions.
![]()
- Open M_Create-Dimensions.dwg.
- To create a linear dimension:
- On the Dimensions panel, click Linear.
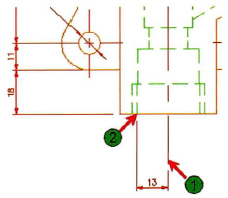
- Click the points indicated in the following image and position the dimension as shown.
- Repeat the Linear Dimension command and place dimensions as shown.
Note: You correct the spacing in the next step.
- To correct the dimension spacing.
- On the Dimensions panel, click Dimspace.
- Select the inner most dimension for the base.
- Click the remaining three dimensions from bottom to top.
- Press ENTER. Press ENTER again to accept Auto spacing.

The dimensions are equally spaced.
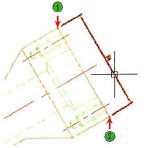
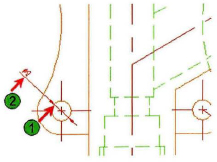
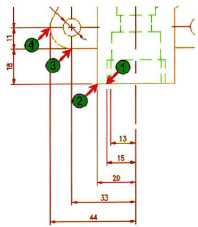
- To create an aligned dimension
- On the Dimensions panel, click Aligned.
- Select point (1) as shown.
- Select point (2).
- Position the dimension as shown.
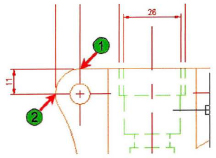
- To create a radial dimension:
- On the Dimensions panel, click Radius.
- Select the arc indicated and position the dimension as shown.

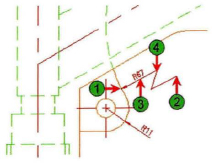
- To create a jogged dimension:
- On the Dimensions panel, click Jogged.
- Select the arc at point (1).
- Specify the center location override at point (2).
- Specify the dimension line location at point (3).
- Specify the jog location at point (4).
- To create a diameter dimension:
- On the Dimensions panel, click Diameter.
- Select the circle indicated (1) and position the dimension as shown (2).
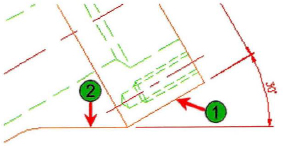
- To create an angular dimension:
- On the Dimensions panel, click Angular.
- Select the line at point (1).
- Select the line at point (2).
- Position the dimension as shown.
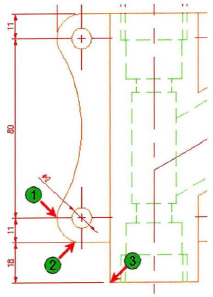
- To create a linear dimension
- On the Dimensions panel, click Linear.
- Select point (1).
- Select point (2).
- Position the dimension as shown.
- To create continuous dimensions on the left side:
- On the Dimensions panel, click Continue.
- The last dimension created is automatically used as the continue dimension.
- Select point (1), point (2), and point (3) in order.
- Press ENTER to finish continuous dimensioning.
- Press ENTER to exit dimensioning.
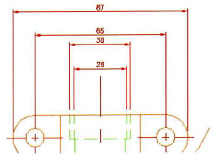
- To create a linear dimension:
- On the Dimensions panel, click Linear.
- Select point (1).
- Select point (2).
- Position the dimension as shown.
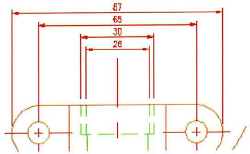
- To create baseline dimensions:
- On the Dimension toolbar, click Baseline.
- The last dimension created is automatically used as the base dimension.
- Select point (1), point (2), point (3), and point (4) in order.
- Press ENTER to complete the baseline command.
- Press ENTER to complete the dimension command.
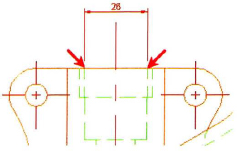
- To clean up the overlapping extension lines:
- On the Dimensions panel, click Dimbreak.
- Right-click. Click Multiple.
- Select the left end extension line 1 and 2 as shown.
- Right-click. Click Break.
The selected extension lines break whenever they cross another extension line.
- Zoom to the drawing extents.
- Close all files without saving.
..................Content has been hidden....................
You can't read the all page of ebook, please click here login for view all page.