
Lesson 32 | Using Viewports
This lesson describes how to create a new rectangular viewport, set the viewport scale factor, and manipulate viewports.
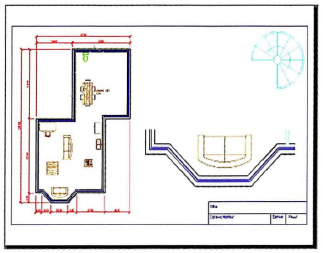
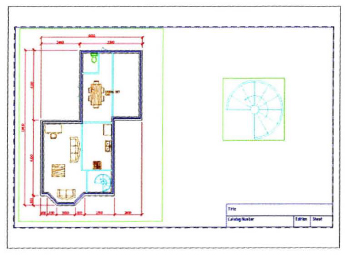
Viewports are a key component in the ability to plot model space geometry from a layout. Each viewport acts as a display portal from the paper layout to the geometry in model space. By creating multiple viewports in a single layout, you can display different aspects of the model geometry at different scales on the same page.
Objectives
After completing this lesson, you will be able to:
- Create a rectangular viewport.
- Modify the viewport scale factor.
- Move, copy, resize, rotate, and delete viewports.
- Rotate the view within a viewport.
Creating Rectangular Viewports
You create a rectangular viewport similar to the way you create a rectangle. However, a rectangular viewport created in a Layout is a kind of window that displays the geometry from the model space view into the current layout page.
You scale the view of the geometry displayed in each viewport and typically plot the overall layout 1:1. You can have more than one viewport on a single layout page showing different views of your drawing at different scales.
Typically the viewport is not plotted. You can create the viewport on a unique layer so that you can use the layer properties to prevent the viewport boundary from plotting.
Command Access
Menu Bar: View > Viewports > 1 Viewport
Procedure: Creating Rectangular Viewports
The following steps give an overview of creating rectangular viewports. Though making a rectangular viewport is relatively simple, it is important to understand the overall setup.
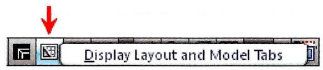
- If the layout tabs are not available, right-click the Layout button in the status bar and select Display Layout and Model Tabs.
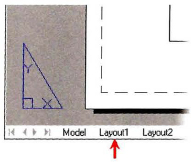
- Activate the appropriate layout tab.
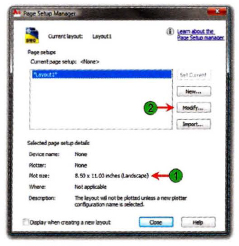
- Confirm the paper size for the layout.
- Insert a title block if one is not already inserted.
- Activate the viewports command.
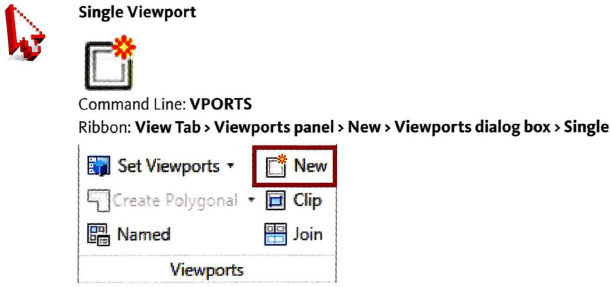
- On the Viewports panel, click New (1).
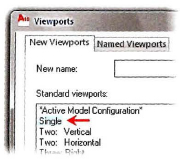
- In the Viewports dialog box, on the New Viewports tab, under Standard Viewports. click Single (2).

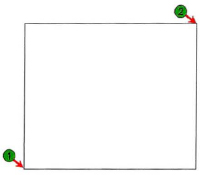
- Create the viewport.
- Specify the first corner (1).
- Specify the opposite corner (2).
- Place the viewport on a layer that you will choose not to print.
- With the command line blank, select the viewport.
- From the Layer Control list, select the layer.
- Press ESC to deselect the viewport.

Guidelines for Creating Viewports
- You should always create viewports on their own layer.
- The viewports layer should be set to non-plotting.
- There is no practical limit to the number of viewports on a single drawing sheet.
- Each viewport can have its own plot scale factor.
Setting Viewport Scale Factor
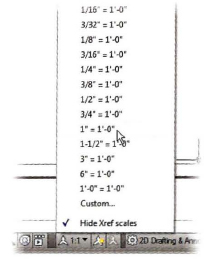
Once you have created a layout viewport, you can set the display of the geometry within it to a specific scale compared to the paper units. This ensures that when you plot the layout at a scale of 1:1, the geometry in the viewport is at the desired scale on the paper.
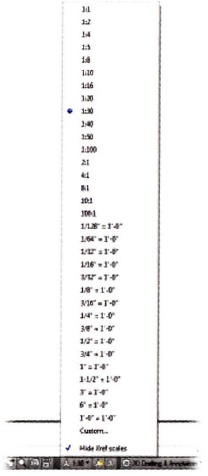
In the following illustration, if 1:30 is selected, the geometry in model space will appear 30 times smaller on the paper. So if 1 unit on the paper is a millimeter, and the units in model space are millimeters, then a line 30 millimeters long in model space will be 1 millimeter long on paper. If the paper were in inches and 1 unit in model space represented a foot, then a line representing 30 feet in model space would be 1 inch long on the paper.
Viewport Scale Access

| Layout tab must be selected. | |
The model or paper space button may be set to either mode:
|
|
| Viewport scale is accessible. |
Procedure: Setting and Locking Viewport Scale
The following steps give an overview of setting a viewport scale and then locking the viewport so that it cannot be changed.
- From the layout tab, select your viewport border.
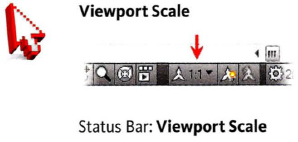
- On the status bar, click the viewport scale list and select the scale to apply to the viewport.
- Double-click inside your viewport to activate model space and use pan to position your objects in the viewport.

- Double-click outside the viewport to activate paper space. Select the viewport border again. On the status bar, click Lock/Unlock Viewport. Now the viewport is locked at the scale you set.
- With your viewport selected, the status line displays its current locked condition and scale.
Guidelines for Setting the Viewport Scale
- To set the scale for a layout viewport, select the viewport boundary. On the status bar, select the Viewport Scale list and pick the desired scale.
- It is a good habit to lock the viewport once the scale is set. Select the viewport boundary and then on the status bar, click Lock/Unlock Viewport.
- You must unlock the viewport before changing the scale. However, you may still pan the model data within the viewport.
- The viewport can be selected in Paper space mode or activated in Model space mode to set the Viewport Scale or Lock/Unlock the Viewport.