
Exercise | Create and Insert Blocks
In this exercise, you create a block from individual lines that represent a phone. You then insert another instance of the phone in the drawing. You then save the drawing file and insert it into a new drawing.
Warning!
If completing the exercise with AutoCAD LT®, in step 9 you will need to use the acadltiso.dwt file.

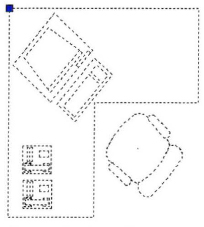
The completed exercise
Completing the Exercise
To complete the exercise, follow the steps in this book or in the onscreen exercise. In the onscreen list of chapters and exercises, click Chapter 10: Working with Reusable Content. Click Exercise: Create and Insert Blocks.
![]()
- Open C_Workstation.dwg.
- To view an object's information:
- On the Insert tab, click Block panel > Create.
- To define the block using the Block Definition dialog box:
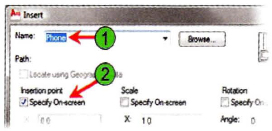
- For Name, enter Phone (1).
- For the base point, click Pick Point (2).
- Snap to the lower right endpoint of the phone (3).
- Under Objects, click Select Objects (4).
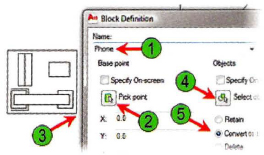
- Select the phone geometry with a window selection.

- Press ENTER to return to the dialog box.
- Under Objects, click Convert to Block (5).
- Verify the setting in the Block Definition dialog box. Click OK.
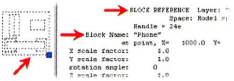
- To view the object information:
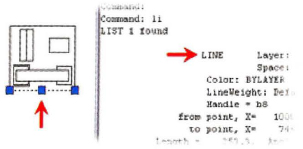
- On the command line, enter list to start the List command.
- Select the line on the phone that you previously selected.
- Press ENTER.
- Notice that the object is now listed as a block reference with the name Phone.
- Press F2 to close the AutoCAD text window.
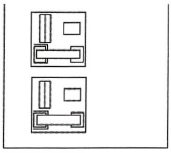
- To insert the block into the drawing:
- Click to place the phone just below the original phone.
- Save this file. On the title bar, notice the path where C_Workstation.dwg is saved.
- To start a new file using a template:
- On the ribbon, click Application Menu > New.
- In the Select Template dialog box, select the acadiso.dwt file.
- Click Open.
- On the Insert tab, click Block panel > Insert.
- To insert the file into the current drawing:
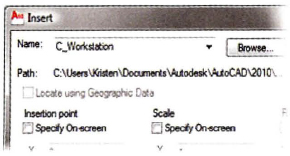
- In the Insert dialog box, click Browse.
- In the Select Drawing File dialog box, navigate to and select C_Workstation.dwg.
- Click Open.
- With C_Workstation now listed in the Insert dialog box, click OK to insert the C_Workstation block into the drawing. Insert the block anywhere in the drawing window, or if you clear the option to specify the insertion point on -screen, it inserts the block at 0,0.
- To view the block in the drawing:
- Zoom out to view the block.
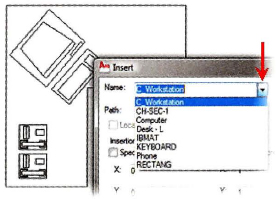
- On the Insert tab, click Block panel > Insert.
- Select the list and notice that the C_Workstation drawing is now inserted as a block into the current drawing along with all of the blocks that belonged to that drawing. Each of these blocks is now part of the current drawing database.
- Click Cancel to close the Insert dialog box.
- To view other properties in the drawing:
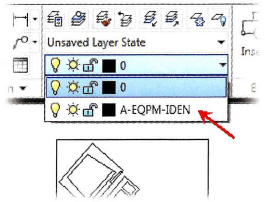
- On the Home tab, click Layers panel > Layer Control.
- Notice that the layer A-EQPM-IDEN is now part of the current drawing database. This layer was brought into the drawing along with the C_Workstation block.
- Close all files. Do not save.
..................Content has been hidden....................
You can't read the all page of ebook, please click here login for view all page.