
Lesson 12 | Creating New Objects from Existing Objects
This lesson describes how to duplicate geometry in the drawing by using the Copy command.
Since the inception of computer aided design, one of the biggest benefits has been the ability to easily copy geometry and use it in other places on the drawing instead of having to manually redraw the geometry when you need it.
Objectives
After completing this lesson, you will be able to:
- Use grips or the Copy command to copy objects in the drawing.
Copying Objects
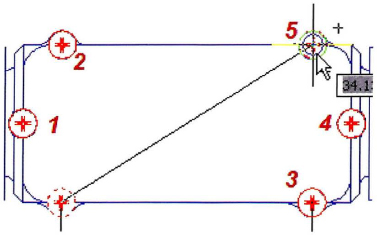
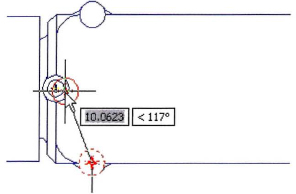
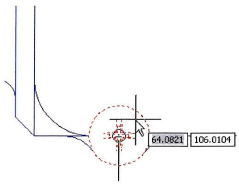
In conventional drafting, one of the most time-consuming tasks is to duplicate an object. You use the Copy command to quickly create duplicates of objects at a specified distance from the original.
After starting the Copy command and selecting the object(s) to copy, you then specify the base point (where the object is being copied from) followed by the second point or displacement (where the object is being copied to). To create multiple copies, simply continue specifying second points or displacement values.
Command Access

Copy Command vs. Clipboard Copy
Do not confuse the Copy command with other similar copy commands found on the shortcut menu. If you select an object and right-click anywhere in the drawing, the Copy and Copy with Base Point options appear on the shortcut menu. These options copy geometry to the clipboard, as in other standard Windows applications, making the geometry available to Paste in other drawings.
![]()
Procedure: Copying Objects with the Copy Command
The following steps describe an overview for copying objects in the drawing.
- On the ribbon, click Home tab > Modify panel > Copy.
- Select the object(s) to copy and press ENTER.
- Specify a base point for the copy.
- Specify a second point or displacement.
- Continue to specify second points to create additional copies.

Procedure: Copying Objects Using Grips
The following steps give an overview of using grips to copy objects.
- Select an object to activate its grips.
- Click a grip to activate grip edit mode. By default, this point will also be used as the base point for the move.
- Right-click anywhere in the drawing. Click Move.
- Right-click anywhere in the drawing. Click Copy.
- Click to position the copied object in a new location.
Guidelines
Follow these guidelines when using the Copy command:
- When you specify the base point for the copy, it should be on or near the object being copied unless you are using other objects to define a reference vector for the copy.
- By default, the option for Noun-Verb selection is turned on in the software; this enables you to select the objects to copy prior to starting the Copy command.